Notifyer System Integration with Pipedrive
Automate your WhatsApp messaging workflows with Pipedrive and Notifyer System
This guide walks you through connecting Notifyer System with Pipedrive to create powerful automated WhatsApp messaging workflows for your sales and CRM processes
Prerequisites Before getting started, make sure you have:
Notifyer System Account Active Notifyer System account with a subscription plan (Monthly or Pay-as-you-go)
Pipedrive Account Access to Pipedrive CRM platform Setting up your Notifyer System account
Complete the Embedding Process
Before sending WhatsApp messages, you must complete the platform embedding process , which connects your WhatsApp Business account to Notifyer System. The embedding process is required by Meta to ensure proper business verification and compliance with WhatsApp Business Platform policies.
Set up message templates
Notifyer System provides two methods for sending WhatsApp messages:
Option A: Template messages
WhatsApp templates are pre-approved message formats that allow for personalization while maintaining compliance with WhatsApp policies.
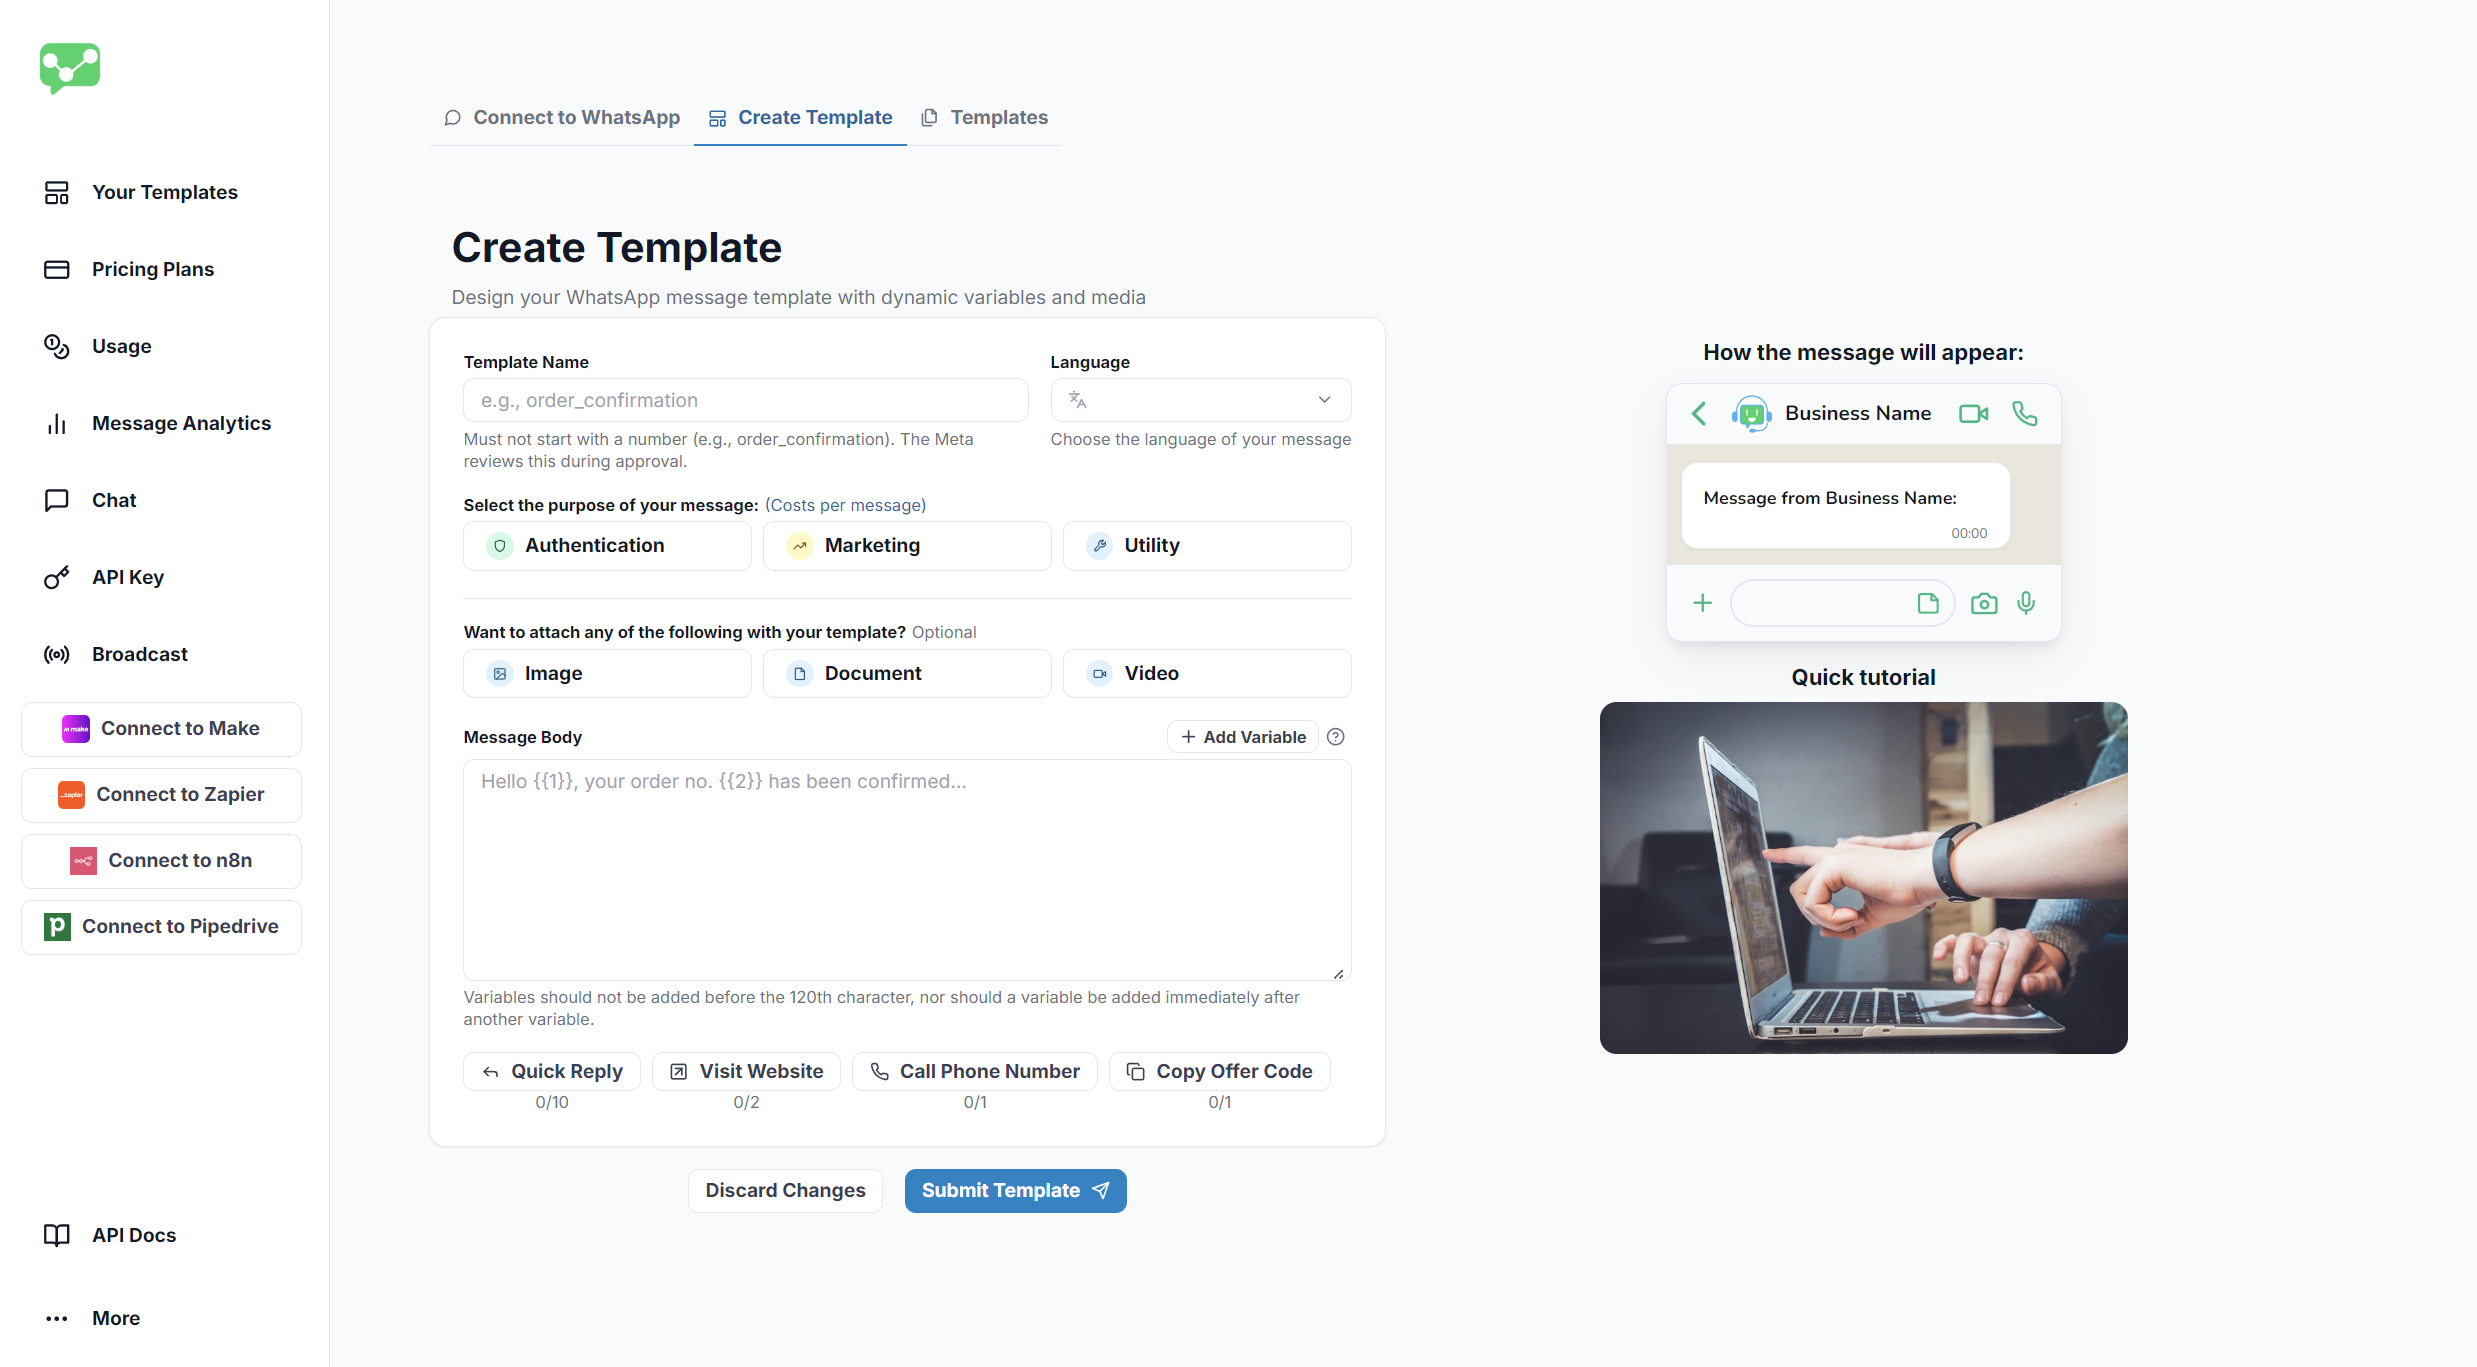
Navigate to Templates
Go to Your Templates in your Notifyer dashboard
Create Template
Click the Create Template tab at the top of the page
Fill out the form
Complete the template creation form with the following details: Choose a descriptive name for internal reference
Choose your template’s primary language
Select the appropriate message category
Optional: Add an image, document, or video header
Craft your message content
Add placeholders using {{1}}, {{2}} format for personalization
Optional: Configure call-to-action buttons
Submit for review
Click Preview and Submit
Template Creation Interface
Templates typically get reviewed within 24 hours. Creating compliant templates that avoid promotional language increases approval chances.
Option B: Non-template messages
For simpler communications, you can send non-template messages that include:
Text Plain text messages within the 24-hour window
Images Photos and graphics in supported formats
Documents PDFs, Word docs, and other file types
Videos MP4 and other supported video formats
Non-template messages can only be sent within the 24-hour customer service window after a customer initiates contact with your business.
Connect Notifyer System with Pipedrive
Follow these simple steps to integrate your Pipedrive account with Notifyer System:
Access the Integration Page
Initiate the Connection
Click the ‘Connect Pipedrive Organization’ button.
Authorize Access
You’ll be redirected to Pipedrive’s authorization page. Review the permissions and click ‘Authorize’ to grant Notifyer System access to your Pipedrive organization.
Confirm Connection
After authorization, you’ll be automatically redirected back to your Notifyer System dashboard. Look for the connection status showing ‘Connected to Pipedrive’ to confirm the integration was successful.
Connecting Notifyer System with Pipedrive
Sending WhatsApp Messages from Pipedrive WhatsAble’s integration with Pipedrive allows you to send WhatsApp messages directly from your deals and contacts without leaving your CRM. This guide will walk you through the complete process.
Verifying Prerequisites Before sending WhatsApp messages, ensure the following requirements are met:
WhatsAble License Status Must show as PAID
WhatsApp Connection Status Must show as ACTIVE
WhatsApp Business Account Must be properly synced with WhatsAble
You can verify these settings in the WhatsAble Integration section of any deal or contact.
Sending Messages from Deals Accessing the WhatsAble Integration Panel
Navigate to your Pipeline
Go to your Pipedrive Dashboard
Open your desired Pipeline
Select a Deal from your pipeline
Locate the Integration Panel
On the right-hand panel, scroll down past the Summary section
Find the WhatsAble Integration section
WhatsAble Integration Panel
Understanding the Integration Panel The WhatsAble Integration panel displays important connection information:
WhatsAble License Status Confirms your subscription is active
Synced WhatsApp Account Shows which WhatsApp Business account is connected
WhatsApp Connection Status Indicates if your WhatsApp connection is active
Last WhatsApp Communication Displays the date and time of the most recent message
WhatsAble Chat URL Provides a direct link to the conversation
Sending Options Within the WhatsAble Integration section, you’ll find a green “Live Chat” button with a dropdown menu offering three options:
Live Chat Opens the WhatsAble chat interface directly within Pipedrive
Send Scheduled Message Schedule a message to be sent at a specific date and time
Send Template Send a pre-configured template message immediately
Option 1: Send Scheduled Message Use this option when you want to send a message at a specific future date and time.
Open the Scheduled Message Modal
Click the dropdown next to the Live Chat button
Select “Send Scheduled Message”
A modal window will appear with the following fields
Configure Required Fields
The recipient’s phone number(s) associated with the deal. This field is automatically populated from the deal’s contact information.
Your connected WhatsApp Business account. This field is pre-filled and cannot be modified from this interface.
Choose from your pre-created message templates. These templates must be created beforehand in the Notifyer by WhatsAble dashboard.
Once you select a template, all required placeholder fields will appear dynamically. Fill in each field carefully to personalize your message (e.g., customer name, appointment time, order details).
Select the exact date and time you want the message to be sent.
Specify the timezone from which you’re scheduling the message to ensure accurate delivery timing.
Add Optional Information
Include an internal note for your team. This note is only visible within Pipedrive and helps with tracking and context.
Assign labels to categorize and organize your communications for easier filtering and reporting.
At the top of the modal, you’ll see your most recent messages with this contact (if any previous conversations exist), providing helpful context before sending.
Schedule the Message
Review all information carefully
Click the “Schedule Template” button at the bottom of the modal
Your message is now scheduled and will be sent automatically at the specified time
Message successfully scheduled! It will be sent at the specified time.
Use this option to send a pre-configured template message immediately without scheduling.
Open the Send Template Modal
Click the dropdown next to the Live Chat button
Select “Send Template”
A modal window will appear with the following fields
Configure Required Fields
The recipient’s phone number(s) associated with the deal. This field is automatically populated from the deal’s contact information.
Your connected WhatsApp Business account. This field is pre-filled and cannot be modified from this interface.
Choose from your pre-created message templates. These templates must be created beforehand in the Notifyer by WhatsAble dashboard.
Once you select a template, all required placeholder fields will appear dynamically. Fill in each field carefully to personalize your message (e.g., customer name, product details, tracking numbers).
Add Optional Information
Include an internal note for your team. This note is only visible within Pipedrive and helps with tracking and context.
Assign labels to categorize and organize your communications for easier filtering and reporting.
At the top of the modal, you’ll see your most recent messages with this contact (if any previous conversations exist), providing helpful context before sending.
Send the Message
Review all information carefully
Click the “Send Template” button at the bottom of the modal
Your message will be sent immediately
Message sent successfully!
The process for sending WhatsApp messages from contacts is nearly identical to sending from deals, with minor differences noted below.
Accessing the WhatsAble Integration Panel
Navigate to Contacts
Go to your Pipedrive Dashboard
Navigate to the Contacts menu
Select your desired Contact
Locate the Integration Panel
On the right-hand panel, scroll down past the Summary section
Find the WhatsAble Integration section
WhatsAble Integration Panel
Understanding the Integration Panel The WhatsAble Integration panel displays the same connection information as in deals:
WhatsAble License Status Confirms your subscription is active
Synced WhatsApp Account Shows which WhatsApp Business account is connected
WhatsApp Connection Status Indicates if your WhatsApp connection is active
Last WhatsApp Communication Displays the date and time of the most recent message
WhatsAble Chat URL Provides a direct link to the conversation
Sending Options The same three options are available:
Live Chat Opens the WhatsAble chat interface directly within Pipedrive
Send Scheduled Message Schedule a message for a specific date and time
Send Template Send a template message immediately
Key Difference : Phone numbers are pulled from the contact’s information rather than deal-specific numbers. All other fields and processes remain identical to sending from deals.
Best Practices
Before Sending Messages Always check that your WhatsApp connection shows as ACTIVE before attempting to send messages to avoid delivery failures.
Template Management
Ensure your message templates are up-to-date in the Notifyer dashboard
Test templates with yourself before using them with customers
Create templates in advance for different scenarios
Double-Check Phone Numbers
Phone Number Verification
Confirm the recipient’s phone number is correct
Verify the number includes the country code (e.g., +1 for US)
Update contact information if numbers are missing or incorrect
Message Organization
Develop a clear labeling system for easier tracking
Apply consistent labels across your team
Use labels for reporting and analytics purposes
Documentation Best Practices
Document the purpose of each message for future reference
Include context that will help team members understand the communication
Keep notes concise but informative
Maintain Context
Always check conversation history before sending new messages
Avoid sending duplicate or redundant information
Ensure message continuity for better customer experience
Timing Considerations
Consider your recipient’s timezone when scheduling messages
Avoid sending messages during off-hours or weekends unless necessary
Set reminders to follow up if no response is received
Create Clear Variable Names
Template Creation
Make placeholder fields intuitive for anyone on your team
Use descriptive variable names (e.g., customer_name, order_date)
Test variable population before mass sending
Troubleshooting
WhatsApp Connection Shows as INACTIVE
Reconnect WhatsApp Account
Reconnect your WhatsApp Business account in the WhatsAble dashboard
Verify Configuration
Verify your WhatsApp Business account is properly configured
Contact Support
Contact WhatsAble support if the issue persists after reconnection
No Templates Available in Dropdown
Create Templates
Create templates in the Notifyer by WhatsAble dashboard first
Check Approval Status
Ensure templates are approved by WhatsApp (if required for your template type)
Refresh Page
Refresh your Pipedrive page after creating new templates to see them appear
Scheduled Message Not Sent
Check Connection Status
Verify your WhatsApp connection was active at the scheduled time
Verify Timezone
Check that the timezone was set correctly when scheduling
Review Message Logs
Review the message logs in WhatsAble for error details and delivery status
Phone Number Not Appearing
Verify Phone Number Exists
Ensure the contact or deal has a valid phone number in Pipedrive
Check Format
Verify the phone number format includes the country code (e.g., +1234567890)
Update Contact
Update the contact information if the phone number is missing or incorrect
Template Variables Not Populating
Check Variable Names
Ensure variable names in your template match the fields you’re filling
Verify Data Source
Confirm the data source (contact or deal) has the required information
Test Template
Send a test message to yourself to verify variable population before sending to customers
Verify Recipient Number
Confirm the recipient has an active WhatsApp account on that number
Check Message Content
Ensure your message complies with WhatsApp’s business messaging policies
Review Credits
Verify your WhatsAble account has sufficient credits or an active subscription
Contact Support
If issues persist, contact WhatsAble support with the message details
For more information about template creation and management, visit the Notifyer by WhatsAble dashboard or contact our support team.
Need help? Our support team is ready to assist you:
For additional automation platform integrations and advanced configurations, please contact our support team or check our integration documentation.